Defining Schedule Patterns
In Aspen, schedule patterns represent all of the different ways course sections meet in your school’s schedule. Schedule patterns consist of a course’s days per cycle and periods per cycle.
To create a schedule pattern, you determine the size (days and period), style, and terms of the pattern. Depending on your selections, Aspen provides you with a clickable Days/Period grid in which you click boxes to select the possible meeting times within the pattern:

In order to build your schedule, you need to map out all schedule patterns valid for your master schedule.
Schedule patterns have different shapes. For example, flat courses meet on the same days at the same time in the cycle.
![]()
(A section that meets the same period everyday)
Other courses have a lab period attached.
![]()
(A section that meets the same period every day, but meets an extra period one day)
Or, some courses meet on different days and different periods in a cycle.
![]()
(A course that meets a different number of periods on particular days in a cycle)
In order to build your schedule, you need to map out all of the schedule patterns valid for your master schedule.
|
Note: To give you a head start, Aspen can initialize your schedule patterns from your current year’s master schedule. But, if you rotated your current schedule, it is better to create your schedule patterns from scratch. |
These are the unrotated patterns.
|
Notes:
|
After you create all of your schedule patterns, group your patterns into pattern sets that apply to the different meeting shapes of courses. For example, you might create pattern sets named Everyday 1-period, Everyday 3-period, and Every Other Day.
To create a schedule pattern:
- Log on to the Build view.
- Click the Global tab.
- Click the Pattern Library side-tab.
- On the Options menu, click Add. The New Schedule Pattern page appears.
-
In the area at the top of the page, you define the shape of each pattern.
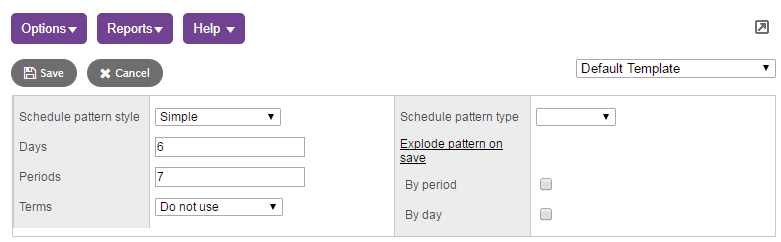
- At the Schedule pattern style drop-down, select one of the following:
- Simple. Use simple patterns to create patterns for courses that meet on a fixed schedule of days and periods during a cycle. For example, courses that meet first period everyday.
- Compound. Use compound patterns to create patterns for courses that have complicated shapes, such as lab courses, by combining a simple pattern and a list of child patterns. For example, courses that meet second period everyday, and an additional consecutive period once per week.
- Component-based. Component-based patterns are sets of patterns that shift independently of each other. Component-based patterns can be used in conjunction with the Pattern Exclusion rule.
|
Note: The style you select determines the Days/Periods grid and any other fields that appear on the page. |
- Type the number of Days and Periods in this schedule pattern to create a matrix for selecting the possible period/day combinations.
|
Note: If you have defined days and periods for this scenario, those values default in these fields. Do not change these values unless this scenario has multiple bell schedules. |
- To determine the schedule terms this pattern applies to, click the Terms drop-down to select one of the following:
- Do not use: This pattern can be used for any schedule term. You should select this for most patterns. For example, the system can use an everyday pattern to schedule a first semester, second semester, or all-year course.
- Same across terms: This pattern applies to a particular schedule term and has the same day and period across terms. Then, type the number of terms in the empty box. For example, assume a course meets every day during the first and third trimester. After you select this checkbox, type 3 in the empty box, and press TAB; two Term boxes appear above the matrix. Select the terms for which you want this pattern to apply.
- Vary across terms: This pattern only applies to a particular schedule term and has different days and periods for different terms. Then, type the number of terms in the empty box. After you type the number of terms to which this pattern applies, the system displays that number of matrixes, for each of which you paint the appropriate patterns. (This option is not common.)
- Click the Schedule pattern type drop-down to select one of the following (for information purposes only – not required):
- Flat: A pattern that meets the same number of days, the same number of periods each cycle.
- Free Form: A pattern that meets any days and periods without a clear shape.
- Lab: A pattern that meets one flat block, with an extra period(s) on certain days.
- You can explode Simple and Compound pattern types. Below Explode pattern on save, select the By period and By day checkboxes if you want the system to create every possible pattern based on the pattern you create in the grid after you click Save. Exploding patterns minimizes the number of patterns you actually define. Most schools need to define only a few patterns, and the system creates all versions of that pattern for them.
-
For example, if you explode a simple pattern with five schedule days 1(A-F) by period, the system creates patterns for 2(A-F), 3(A-F), 4(A-F), and 5 (A-F).
Note: By period pushes the pattern down, and By day pushes the pattern across.
- In the grid, click the boxes that represent the periods and days of this schedule pattern.
|
Note: To select all unselected or deselect all selected days in a column, click the Days column header. To select all unselected or deselect all selected periods in a row, click the Period row header. |
- Click Save.