Create an analytic definition
There are a number of analytic definitions included with Aspen
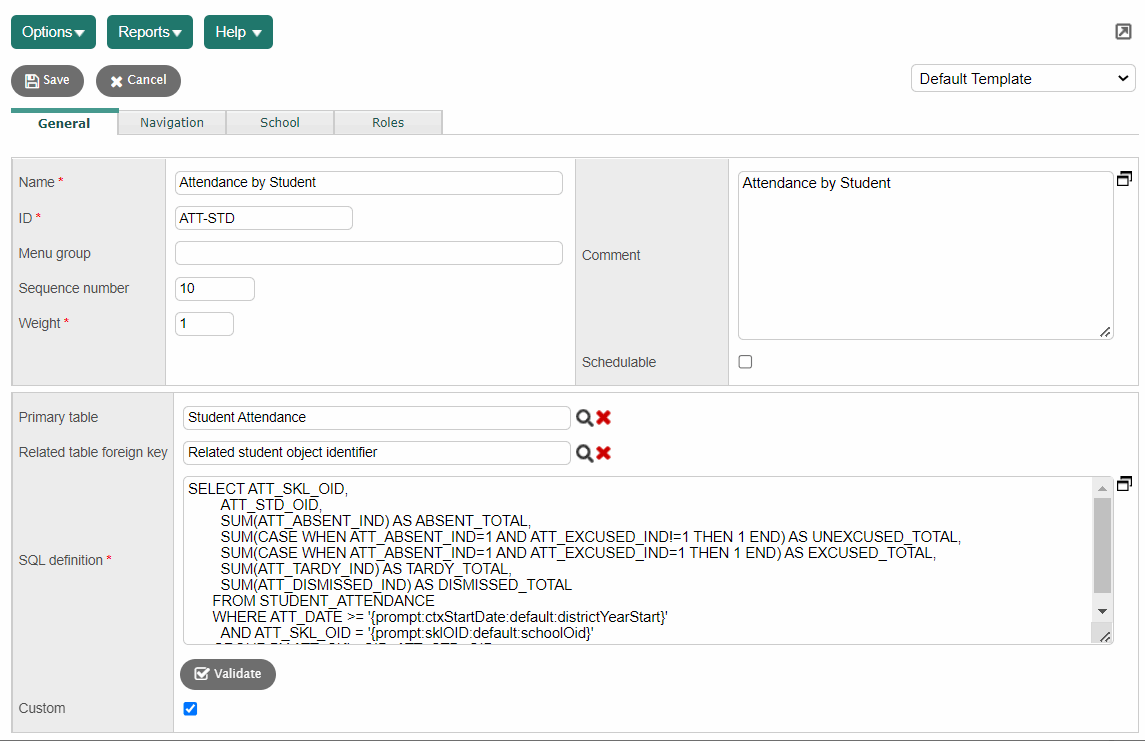
- Attendance by Student
- Staff Attendance
- Attendance Totals by YOG
-
-
- Period Attendance by Student and Section
- Period Attendance by Student
- Transcript by Student
|
Note: The included analytic definitions are based on a standard database configuration. They might not work if you have customizations. |
To create your own analytic definition:
- Log
on to the
- Click the Tools tab.
- Click the Analytic Definitions side-tab. Any existing analytic definitions appear.
- On the Options menu, click Add.
-
-
Field
Description
Name
Type a descriptive name for the analytic definition.
ID
Type an identifying number or code for the analytic.
Note: Aspen does not require a specific syntax or naming convention, but it is good practice to have an accepted naming convention for your analytic IDs for the sake of consistency and clarity.
Menu group
Type the name of the Options sub-menu the analytic will appear on. For example, Analytics.
Sequence number
Type a number to indicate the analytic's placement on the Options menu.
Weight
Type a number to indicate the analytic’s priority when multiple analytics are running simultaneously.
Comment
Type a comment to document the analytic definition. The Comment field is a good place to make notes regarding the purpose of an analytic.
Schedulable
Select this checkbox to enable this analytic to be scheduled to run as a job. For instructions, see Create and Schedule Jobs.
Primary table
Click
 to
select the primary table. The table you select in this field
must be the root table in the SQL
Definition field.
to
select the primary table. The table you select in this field
must be the root table in the SQL
Definition field.Related table foreign key
Click
to
select the related table foreign key. The analytic results
will have a reference to the related table. If selecting Student or Staff
as the related table, field sets can utilize any field from
that table. Note: The available options in this field are determined by the selection you made in the Primary table field.
SQL Definition
Type the SQL query. Standard SQL syntax and Prompted Query syntax are acceptable in this field.
Note: The use of Prompted Query syntax allows for year-to-year reuse of the analytic without the need to edit the query.
Validate
Click this button to validate the SQL code. An error message appears if there is a problem with the code. If you do not click the Validate button before saving, a validation is run at that time.
Custom
Select this checkbox if you have customized this analytic definition and want to preserve the changes after any future Aspen updates.
- Click Save. If you have not clicked the Validate button to validate the SQL, a validation is run before saving.
- To define the locations, including NavID and views, at which users can run the analytic from the Options menu, click the Navigation sub-tab.
- To add a new location at which users can run the analytic from the Options menu:
- Click Add.
- In the NavID field, type the NavID (location name).
- Select the checkboxes for the views where the analytic appears.
- Click OK.
- Click Save.
- To change the views at which users can run the analytic from the Options menu:
- Click the NavID.
- Select or deselect the checkboxes for the views to be changed.
- Click OK.
- Click Save.
- To delete a location at which users can run the analytic from the Options menu:
- Select the checkbox for the NavID.
- Click Delete.
- Click Save.
- To
define which
- To give or deny specified units the ability to run the analytic in the Options menu:
- Click the Visibility type drop-down, and do one of the following:
- To deny a unit the ability to run the analytic in the Options menu: Select Exclude.
- To give a unit the ability to run the analytic in the Options menu: Select Include. If you include a school here, all other schools are excluded.
- Click Add.
- Click the Owner type drop-down and select the type of unit to which you want to give or deny the ability to run the analytic from the Options menu. The pick list refreshes to display all units of that type currently defined in the system as owned by the organization whose view you are logged in to.
- Select the district(s)
- Click OK.
- Click Save.
- To define which user roles can run the analytic from the Options menu, click the Roles sub-tab.
- To give or deny specified user roles the ability to run the analytic from the Options menu:
- Click the Role visibility type drop-down, and
do one of the following:
- To deny a specific user role the ability to run the analytic from the Options menu: Select Exclude.
- To give a specific user role the ability to run the analytic from the Options menu: Select Include.
- Click Multi-Add...
- Select the desired user role(s) from the User Role Pick List.
- Click OK.
- Click Save.
Analytic definitions also can be imported as bundles. For instructions, see Import a bundle.