Configure and schedule jobs to run Aspen's exports
To be completed by Aspen system administrator:
After customizing the exports, it is recommended you configure the exports and schedule jobs to run the exports as described below:
- Run an initial full export.
- Add the export to the jobs list by making it schedulable, and create and schedule one job to run a full export nightly at 10 pm.
- Create and schedule a second job to run an export for updates only every 30 minutes.
To run the full initial export:
- Select Tools > Exports.
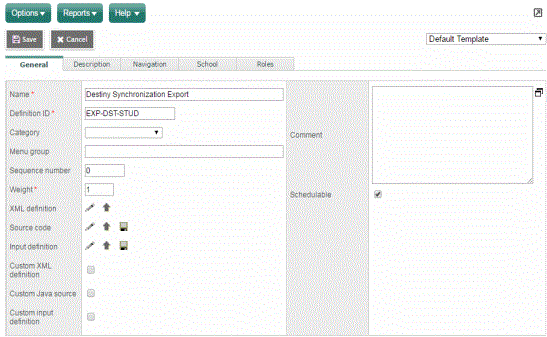
- Find and click Destiny Synchronization Export. The Destiny Synchronization Export details page appears.
- Select Options > Run. The Aspen: Destiny Synchronization Export pop-up appears.
- The first time you run the export, do not select Send updates only on the pop-up. It is important to send all records the first time.
- Click Run, and wait until the job finishes.
To add the export to the jobs list by making it schedulable, and create and schedule a job to run the full export every night at 10 pm:
- Select Tools > Exports.
- Find and click Destiny Synchronization Export. The Destiny Synchronization Export details page appears.
- To add the export to the Jobs list, select the Schedulable checkbox.
- Click Save.
- Under the Exports side-tab, click Jobs. The Destiny Synchronization Export should be listed. If not, repeat steps 3 and 4.
- Click Destiny Synchronization Export.
- Complete the required fields using the following table so the job runs according to schedule:
-
Field
Description
Name
Type a name for the new job, such as Destiny Full Export Nightly. Enabled Select this checkbox. Start time Type 10:00 pm. End time
Leave this field blank. Repeat time (minutes) Type 0.
- At the bottom of the page, click the Periodic sub-tab to set the frequency for the job.
- At the Start Date and End Date fields, click to enter the start and end dates of running the job. These fields must be completed for the job to run nightly.
- In the Repeat Days field, type 1 for the number of days between each day you want the job to run.
|
Note: When you define a periodic schedule, the value you enter in the Repeat Days field includes weekend days. |
- Click Save.
To schedule a job to run the export of updates only every 30 minutes:
- Select Tools > Exports.
- Find and click Destiny Synchronization Export. The Destiny Synchronization Export details page appears. The Schedulable checkbox should already be selected.
- Under the Exports side-tab, click Jobs. The Destiny Synchronization Export should be listed.
- Select Options > Add.
- Use this table to enter information in the required fields so the job runs according to schedule:
-
Field
Description
Name
Type a name for the new job, such as Destiny Update Export.
Input parameters
Click Set. Select the Send updates only checkbox.
Aspen uses an audit to track when a field is updated. This export checks the Aspen audit records for changes to Student, Staff, School Course, Schedule Master and Student Schedule Change. If one of these fields has been changed, it considers it an update. If you notice that some fields are not being exported to Destiny, it is possible that these fields are not being audited or the audit has been broken.
Enabled Select this checkbox.
Start time
To run this job every 30 minutes every day, type 12:00 am.
End time
Type 11:30 pm.
Repeat time (minutes)
Type 30.
- At the bottom of the page, click the Periodic sub-tab to set the frequency for the job.
- At the Start Date and End Date fields, click to enter the start and end dates of running the job. These fields must be completed for this job to run.
- In the Repeat Days field, type 1 for the number of days between each day for the job to run.
|
Note: When you define a periodic schedule, the value you enter in the Repeat Days field includes weekend days. |
- Click Save.
- Select Options > Run.
- To monitor your job queue, select Tools > Reports > My Job Queue.

