Use the online student conflict matrix to view a student’s most recently built schedule in an easy-to-analyze format.
|
Note: Before you view one student’s schedule, you can use the Filter Students option to create a list of students whose schedule conflicts you want to view. |
To view and use the online student conflict matrix:
- Do one of the following:
- Log on to the Build view.
- Log on to the School view.
- Click the Student tab, and select a student.
- Click the Schedule side-tab.
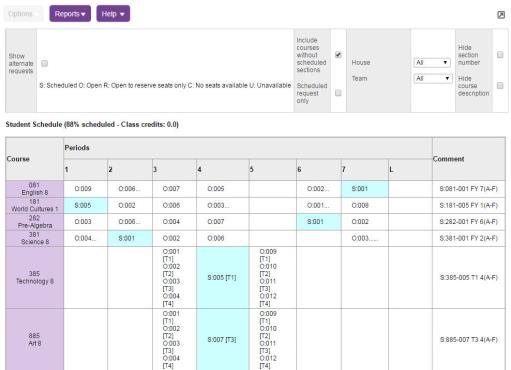
- On the Schedule side-tab, click Conflicts. The student’s conflict matrix appears:
-
At the top of the page, you can filter
 a set of criteria to selectively screen out incoming information, such as "all active students" or "former students"
the information that appears:
a set of criteria to selectively screen out incoming information, such as "all active students" or "former students"
the information that appears:- Select the Show
alternate requests courses that students have requested to attend for the next school term checkbox
to display the schedule status for the student’s alternate request.
- Select the Include courses without scheduled sections checkbox to display only courses with scheduled sections.
- Select the Scheduled request only checkbox to include only requests that are scheduled.
- At the House and Team field, specify the team and house that sections are available for.
- Select the Hide section number checkbox to hide the section number in each cell.
- Select the Hide course description checkbox to hide the course names in the Course column.
- Select the Show
alternate requests
- The conflict matrix is driven by the student’s requests. Each row represents a request. Each column represents a period in the schedule. Within each course/period cell, one of the following might appear:
- Blank: There is no section scheduled for the request in that period.
- S: (section number) This indicates the period and section number the student is actually scheduled in for this request. If this cell is highlighted in blue, the student is scheduled in this course.
- O: (section number) This indicates sections that are scheduled in the period and still have seats open.
- C: (section number) This indicates sections that are scheduled in the period, but have reached the class size.
- The Comment column displays the scheduled status for the corresponding request.
- Click any non-empty cell to view detailed information about the sections of that course available during that period.
- Filter by Period, Track ID, Term, Department, Team, or House.
- At the Order by field, you can select to order the sections by Course, Period, Teacher, Term, or Track ID.
- Select the Requested only checkbox to display only courses requested by the student.
- Select the Valid sections only checkbox to view only sections the student can be scheduled in.
- Select the Allow conflicts checkbox to include sections in the list that could cause conflicts in the student’s schedule.
- Select the Allow
all over max checkbox to include sections in the list that
would be over the
- At the top of the pop-up, you can filter the sections that appear by doing the following:
For each course section offered during the selected period that also meets any filters used, the pop-up displays the teacher, term, schedule, unrotated schedule, total students scheduled in the course, max capacity for the section, if the section is closed, section type, team, house, platoon, and if the section is an inclusion section.
Use this information to fix any conflicts on the student’s schedule.